
Each major upgrade of Windows operating systems improves them not only in terms of optimization and program functions, but also in terms of visual design of the user interface. The first versions of the OS were dominated by minimalism, and then glazed styles came into vogue. Today, the company is going back in the same direction. Using the example of the 10, you can see how the interface design has become angular and minimalistic again. In spite of that the graphics are improving all the time and only the cursor stays the way it was 10 or even 20 years ago. Many people are happy with this, but some want to use a unique cursor. Especially for these people, there are a number of ways to change it. We need to look at how to change the mouse pointer on Windows 7, and what ways you can do it.
- How to change the mouse cursor on Windows 7 with the standard means of the system: choosing from preset cursors
- How to change the Windows 7 mouse cursor to custom
- How to install mouse cursor on Windows 7 via third party programs
- CursorFX
- RealWorld Cursor Editor
- Changing the mouse pointer size on Windows 7
How to change the mouse cursor on Windows 7 with the standard means of the system: choosing from preset cursors
To put it bluntly, changing the appearance of the cursor on Windows 7 or 10 operating system is not a big problem. Any more or less experienced user will be able to do it with the system tools that will be described below, and third-party applications that have more extensive features and choice of cursor appearance.
Important! Built-in and third-party applications suppose to change the size of the pointer, change its color or tint, add a color inversion effect and add a different style of the pointer that would be drastically different from the previous one.
Almost all Windows operating systems allow you to customize the appearance of the pointer to your own taste. It concerns mostly the new Windows 7, 8, 8.1, 10, although some editing of the cursor design is also available in Vista or XP.
Standard Display.
If a person wants to change the design of their pointer or its size, just go into the”Control Panel” and find the mouse properties utility by going to the”Simplified Mouse Operation” section. More details about how to set mouse cursor on Windows 7 will follow.
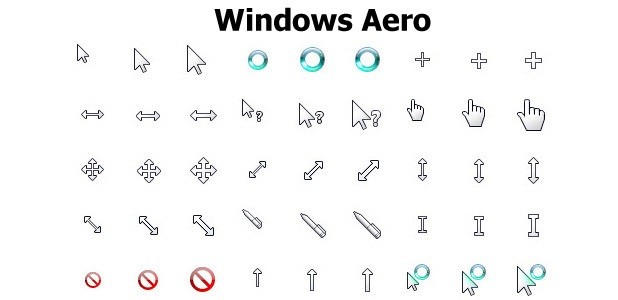
Nice animations and styles for pointers
To change the appearance of the mouse pointer, you need to follow the step-by-step instructions that will take you to its properties window. It is presented below:
- Open the”Start” menu and enter the phrase”Control Panel” in the search field.
- Open the”Control Panel” window and select the”Small” or”Large” icon display mode.
- Find among the presented utilities a link to the”Mouse” window and go to it.
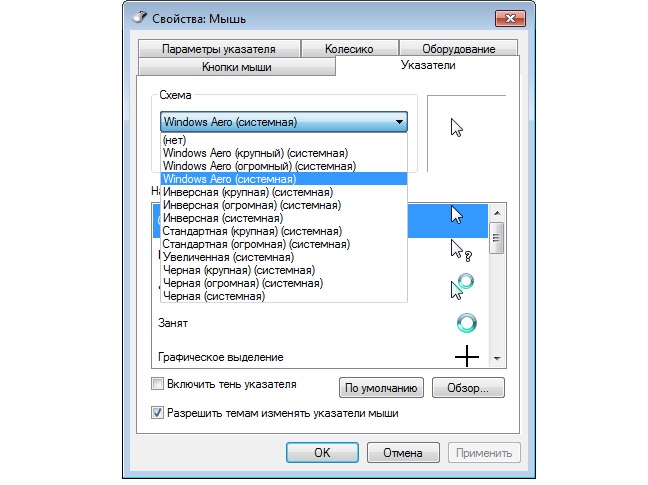
- Go to the”Pointers” tab and adjust your cursor.
- Click on the scheme you are using to select the styles that are available for installation.
- View all pointer states when working with text data, links, selection mode, and other mouse states.
- Apply and save changes.
If the person has not found a suitable display scheme, you can try to change some of the cursor states from the already available schemes. To do this, in the”Customize” field, click on any state of the display or select the current state. You can also click”Browse” to select one state from the list of standard cursors.

The process of setting up the arrow in the standard OS settings
Important! It is always possible to set a number of additional parameters, including the shadow cast by the pointer, the prohibition to change the cursor to preset or downloaded themes and so on. Do not forget about the speed of the arrow, its visibility and the ability to find the cursor on the screen with the Ctrl key.
How to change the Windows 7 mouse cursor to custom
How to change the mouse cursor on Windows 10 – installation instructionsThe cursor is the part of the user interaction interface that people pay most attention to. It is the mouse, not the keyboard, that people use most often. No other personal computer or laptop input device stands anywhere near it.
Standard mouse pointers are standard and suitable for everyone. They don’t flicker in front of your eyes and don’t rush into them when you look at your computer monitor, but some people still want something new and unusual. Especially for such fans of novelty there is a possibility to replace the cursor from the standard set of OS Windows 7 to the custom one. Moreover, the replacement can be done manually and the person does not need any third-party programs, although their use takes place.
All standard cursor models are located in the system folder Cursors, which is in the Windows directory on the system drive. They look like usual files with the extension *ani (for animated cursors) and *.cur (for simple cursors). A set of such documents is usually called a display style for one of the selected layouts.
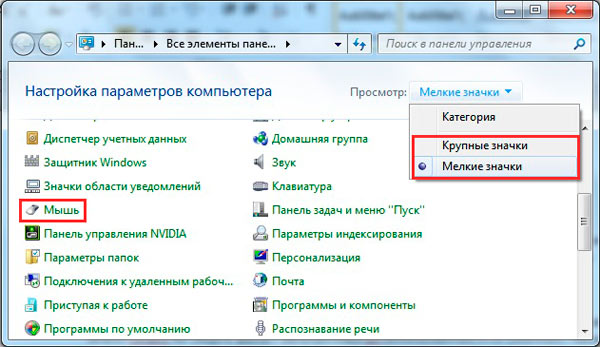
Going to”Control Panel.”
To replace the pointers with custom pointers, you need to:
- Download and install the new theme for the Windows 7 operating system. It must necessarily support cursor change.
- Download the archive with third-party schemes from the link or other place and unzip it.
- Browse through the directories and select the cursor you like.
- Find file with extension INF in the folder of the cursor you like and click on it with PKM.
- Select the context menu item”Install”.
- Wait for the installation and move the data to the system directories.
- Open the”Start” menu and enter there the phrase”Control Panel”.
- Open the”Control Panel” window and select the large icons display mode.
- Find among the presented icons the parameter named”Mouse” and go to it.
- Go to the”Pointers” tab and adjust your cursor.
- Click on your used scheme to select the available styles to set.
- Select the circuit you have created and select all the pointer states for it yourself.
Important! Sometimes it happens that there is no INF-file in the directory with resources. In that case you have to copy and transfer the folder with cursors to the system folder Cursors by yourself and then adjust the display for each option manually.

Resource packs for pointer arrows
How to install mouse cursor on Windows 7 via third party programs
Windows 10 mouse cursor is missing – what to do if it doesn’t display
There are a number of programs and utilities that allow you to change the design of the pointer, its style and some other display parameters, without going to the default settings and any independent action, except for choosing the display scheme you like. Below will be presented a number of programs that accurately answer the question of how to change the mouse cursor on Windows 7 by third-party means:
CursorFX
The program allows one-click installation of any cursor from the database, which will be to the taste of one or another person. The application tools help you not only to select already created cursors, but also to edit them or create your own, unique arrows for each of the selected actions. At the same time, they will not be static, and animated by using all available features of the operating system. You can download the software at special software sites.
RealWorld Cursor Editor
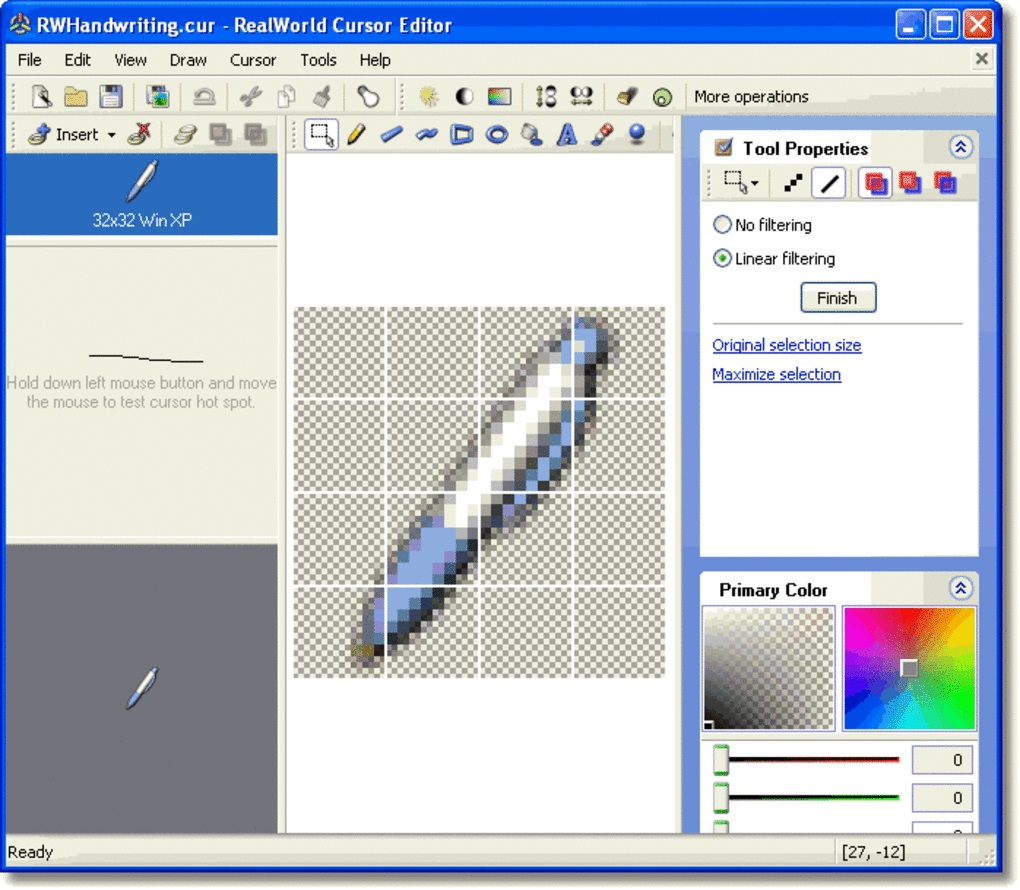
A program that allows a person to create the cursor he wants himself. Of course, this software will be more complicated for beginners, but it is possible to master it. It is enough to download the program the user needs, install it and run a shortcut created automatically on the desktop. Then it remains to choose whether the cursor will be created from scratch or whether some picture should be loaded for it.
RealWorld Cursor Editor interface
After loading, you should specify the type of arrow (normal, animated, multi-layer, and so on). After applying the configurations, the parameters will be saved and the pointer will take on an unusual appearance.
Changing the mouse pointer size on Windows 7
How to disable mouse acceleration in Windows 10
If a person just needs to increase the size of the arrow, then for this you do not need to download any programs. It is enough to use the standard means of the operating system Windows 7. To change the size of the cursor is necessary:
- Open the”Start” menu and enter there the phrase”Control Panel”.
- Open the”Control Panel” window and select the mode of displaying as small or large icons.
- Find among the presented icons the option with the name”Mouse” and go to it.
- Go to the”Pointers” tab.
- Select a scheme from the list, with the caption”Large” or”Huge”.
- Check whether the cursor has changed.
- Press”Apply” and”Ok”.
Important! The”Control Panel” can also be started in an easier way. In order not to search for it, you should call the window”Run” and type”control” in the command line, pressing Enter. The”Control Panel” window will instantly appear on the screen.
Increasing the size of the pointer
In this article, it has been explained how to change the mouse cursor on Windows 7 using standard operating system tools as well as third party software solutions or resource packs. People often want to change the old and dull pointer to their own or game cursor, but do not know how to do it. Following the above step-by-step instructions you can change the appearance of the arrow, its design and shadows with your own hands as often as you like.

- Atomic Heart. 100% walkthrough of the game - 21. February 2023
- Sights of Kazakhstan, what to see first - 16. February 2023
- How to Get a Titanic Cat in Pet Simulator X – Titanic Cat - 29. December 2022