
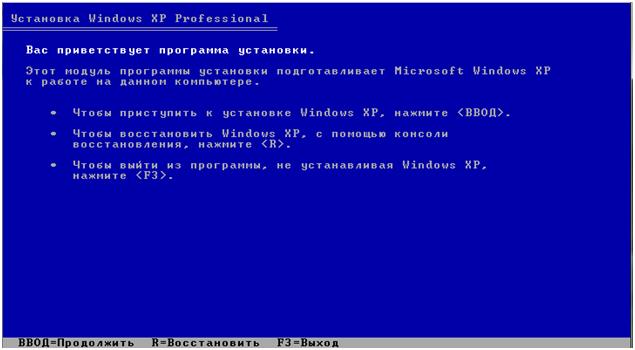
Sometimes the Windows XP operating system stops starting and gives the following errors when you turn on your computer:”ntldr is missing”,”Non system disk or disk failure”,”Boot failure” or”No boot device”. In some cases, the operating system cannot even write anything and just shows a black screen. In any of these cases, you should understand that there is an error in the OS, and it is most likely related to the built-in boot loader. To solve the problem, you will need to restore the XP Windows boot loader. About how to do it and what difficulties will have to face – detailed in today’s material.
What is the boot loader Windows XP
The Windows loader is what every PC or notebook user encounters with, one way or another. However, not everyone knows that this program exists. Talk about its functions and features do not even have to. And this concerns not only those users who use Windows, but even lovers of”sitting” on Linux, although the latter, more than anyone else, should be familiar with the concept of operating system loader.
Repairing the bootloader is not a complicated process
Getting to the point, the Windows boot loader is a special program that allows you to initiate a boot of your operating system that starts immediately after you turn on your computer. The main function of the Windows boot loader is to prepare the PC or laptop for loading the operating system kernel and loading the kernel itself.
Important! If there are several kernels, which are available to load, the bootloader often asks the user which kernel to load, and allows the person to choose one or the other.
XP recovery console.
The most important process of all this action is loading the operating system kernel into the RAM of the computer or laptop. When the boot code fails, the BIOS turns on and control of the process is transferred to the program from the boot sector of the active hard drive partition. Contrary to that, in some cases the OS can be booted only through the programs available in the BIOS package.
Also kernels are not always taken by the boot loader from the hard disk, as there are a number of other ways. For example, getting the kernel program via a WAN or LAN or via external media. These methods of data transfer are typical for debugging kernels at the stage of their development.
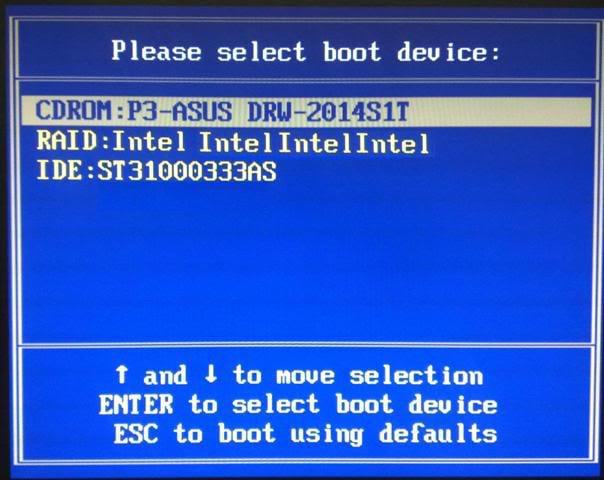
Choosing the media to run
There are quite a few operating systems included in the Windows family at the moment. Consequently, there are several bootloaders as well. From Windows NT to Windows XP, the most common is NTLDR, but from Windows 7 to newer versions (Windows 8 and Windows 10) the new modern boot loader Windows Boot Manager is used.
Recovering MBR in Windows XP
Restoring Windows 10 bootloader – step by step instructions
When the general concepts of what is the boot loader of the operating system are clarified, it is necessary to deal in more detail with the MBR of Windows, booting XP through which is carried out very often.
The boot process consists of many steps, and if at least one of them works incorrectly, the OS will not start. Most often it is in the MBR (Master Boot Record) that errors occur. Before we look at how to repair the Windows XP boot loader, we need to become more familiar with the MBR.
The record itself is a fragment of an executable program. When the computer powers on, the BIOS performs the initial preparation steps and then loads the MBR record into the computer and laptop RAM and hands over all control of starting the operating system to it.
Selecting a copy of Windows to login
If the above errors are displayed on the screen, it means that the booting of Windows XP cannot be done. The problem lies in the boot loader and most often in the boot record, which may have become corrupted.
To restore it, you will need to use the recovery console and follow the step-by-step instructions below:
- Connect the boot disk with Windows XP.
- Reboot your PC or laptop and wait for the operating system to start.
- At this point press the key F11, to bring up the boot window. Then select”Boot from the installation media”.
- Press the”R” key to go to the”Recovery” command line.
- Determine which operating system you want to enter. If it is the only one on the disk, push 1 (“1”).
- Enter the command”fixmbr” without quotes. In case the console asks if you want to allow writing a new boot record, you have to press Y (“Yes”).
- Waiting for the new MBR to finish writing.
- Exit the recovery console and reboot the computer. If all goes well, it will be turned on as usual.
Important! In addition to the errors mentioned above, there are a number of other problems that can lead to the need to restore the boot loader. As an example, there are viruses that block the operating system screen before it has fully booted. They edit the MBR entry.

Console in recovery mode
Restoring the boot sector from a flash drive
How to speed up Windows 7 booting – ways to do it
Sometimes errors can happen with the boot sector of the operating system. In this case, a flash drive or disk with an installation package Windows XP will also help. If the message”NTLDR is missing” appears on the display during OS startup, it is one hundred percent likely that there are problems with the boot record.
Such errors may also occur if the MBR is damaged, so you should perform recovery of both fragments in order not to miscalculate. The general step-by-step instructions for recovering boot records from installation flash drives are as follows:
- Insert the media into a special port of a personal computer or laptop.
- Restart and boot from the installation media as in the previous instruction. You will have to press the F11 key to get to the boot location selection window.
- Press the key with the Latin letter”R” to start the recovery console.
- Select again which operating system you want to enter. If there is only one on the disk, the default is to press one (“1”).
- Write the command”fixmbr” (without the quotes) like in the previous instruction. It’s necessary for rewriting boot record. If the OS asks you to accept the operation, you have to press the”Y”, which means”Yes”.
- Execute the”fixboot” command, which will overwrite the boot sector code and also accept the operation by pressing the”Y” key, which means”Yes”.
- Exit the recovery console by typing”exit”.
Finally you need to reboot your PC or notebook to check if the system boots correctly.
Working with the boot.ini
If configuring and rewriting the boot sector and MBR code doesn’t help, you should work on fixing the Boot.ini file. In order to do that, follow this step-by-step instruction:
- Perform a restart and boot from the installation media. This process has been described in the previous instructions. You will have to press the F11 key to get to the boot location selection window.
- Press the key with the Latin letter”R” to start the recovery console.
- Choose which operating system you want to enter. If there is only one operating system on the disk, by default press 1 (“1”).
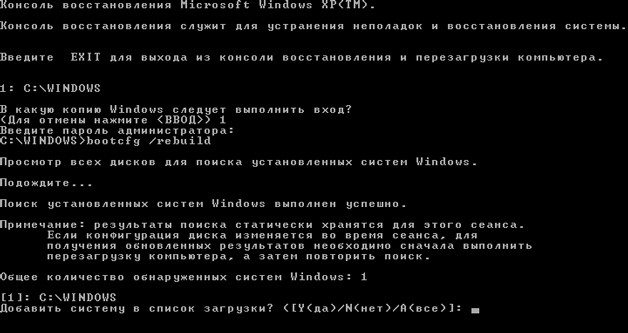
- Once in the console, type the command”bootcfg /rebuild”.
- Waiting for the end of the scan and confirming the use of the found copy of Windows.
Then reboot the PC and observe the changes.
Important! During the scanning process, the PC will check all hard disk sectors looking for a copy of Windows. When it is found, the system will prompt the user to write it to the configuration file, which directly affects the correct start of the OS.
Copying the boot files through the command line
How to uninstall.Net Framework in Windows 10 – description of the ways
If creating and overwriting the MBR does not help, and restoring the boot sector does not give the desired results, the only way to fix the error is to move the files named NTLDR, boot.ini and NTDETECT.COM to the root of the system hard drive. To do this, you need to:
- Insert the media into a special port on a PC or notebook.
- Restart and boot from the installation media as in the previous instruction. You will have to press the F11 key to get to the boot location selection window.
- Press the key with the Latin letter”R” to start the recovery console.
- Select which operating system you want to enter. If there is only one operating system on the disk, the default value is 1 (“1”).
- Write the new MBR code and boot sector as shown in the previous two instructions.
- Without leaving the console, type the command”map”, which will display information about all disks connected to the PC.
- Find the disk containing the Windows distribution.
- Enter the name of the Windows drive and folder to start working with them. Do not forget to press Enter.
- Write the command”cd i386″ to open the folder and then”copy NTLDR C:” to copy the file.
- The same is done for NTDETECT.COM (“copy NTDETECT.COM C:”).
- For boot.ini the process is different – enter the command”Bootcfg /add” and select the desired system.
- Enter the name”XP Professional RU” and specify the parameter”/fastdetect”.
After that the OS should start correctly and without any errors and crashes.

Copying files
So, it’s easy enough to get the OS back to the way it was before. Sometimes the booting of Windows XP is disrupted due to various malfunctions or viruses, but following the step-by-step instructions you can have a hundred percent chance of restoring Windows without installing or reinstalling a new copy of it.

- Predicting Bitcoin’s Future: Insights from Top Crypto Analysts - 26. August 2024
- Peter Molyneux Returns to Gaming with Masters of Albion Announcement at Gamescom 2024 - 21. August 2024
- Blizzard Unveils New Trailer for Diablo 4’s Vessel of Hatred Expansion - 21. August 2024